If I hear it to break the JBW will it damage the temper?
That's a more complex question...
When you're heat treating a sword or knife, it involves multiple steps.
Normalizing is heating a metal and then allowing it to cool slowly sitting in the open. This is done to remove internal stress caused by forging and such. If this is done, it's often done 2-3 times.
Hardening is the step most people are familiar with from TV and movies. Get the metal to the proper temperature, and then quench it, usually in water, brine, or oil. I like canola oil. It works well on many steels and makes the shop smell like someone baked cookies. For stainless steels, this often requires liquid nitrogen. For Hollywood, it requires a person you can stab, quenching it in the Blood of Your Enemy. This would result in a terrible and uneven heat treatment, so I do not recommend it. Hardening makes the blade, well... hard. And brittle. So then you need to take some of the hardness out, especially in the spine of the blade.
So the next step is to either temper or anneal the steel. Many people, even knife people, don't get that these two are not synonymous.
Tempering involves bringing the steel back up to the right temperature, and then allowing it to cool in the air. The edge will cool faster, resulting in it keeping more hardness. The thicker spine will cool slower, resulting in a tougher, more durable end result.
Annealing is essentially the same as tempering with the single significant difference that it's slower. You bring the metal up to temp and then turn off the heat source and let the steel and oven/furnace/forge cool together. Ovens/furnaces/forges are, as you might expect, pretty insulated. So the cooling is slower.
Most knifemakers harden and anneal their blades, but there are lots who mistakenly refer to the annealing process as tempering.
So, back to your question.
If you indiscriminately heat the sword, then yes, you will screw up the heat treating.
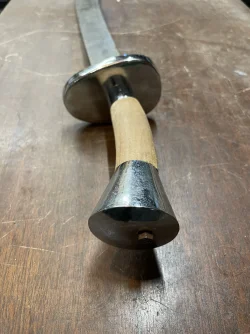
What I would do is wrap the sword in wet cloth, leaving just the ricasso exposed. I would use a torch to apply the heat
to the quillon and let it soak inwards. In an ideal world, I'd have someone holding the torch in place, and I would intermittently put blunt chisel against the quillon and give it a couple whacks. When it breaks lose, get the torch out of there.
Temps vary depending on the specifics of the metal. But it is likely that you will be bringing the metal of the ricasso up to around the temperature used for tempering or annealing. And the ricasso, like the spine, needs less hardness. So if you keep the blade covered and soaked, it will stay cool. Your best bet after the hilt comes loose is to keep the wrapping cool and wet, and let the ricasso cool slowly. Just as should have been done when it was originally tempered.
The steel will be discolored. Depending on the temperature reached it may be dark yellow, brown, or purple. This is just the surface. It's always like that after hardening, tempering, or annealing. A bit of work will grind it off. You can do it by hand, if you don't have a grinder. Just wrap sandpaper around a block and go to town.
I bet that's more answer than you expected...