Congrats MACaver~!
You are using an out of date browser. It may not display this or other websites correctly.
You should upgrade or use an alternative browser.
You should upgrade or use an alternative browser.
MACaver
- Thread starter Flatlander
- Start date
Cave Formation of the Week: Cave Pearls
Many I've seen are cemented to the floor as in the last photo because the level of water has dropped or dried out and then later as water precipitates down to the floor and hits the formation it doesn't turn over like normal and thus becomes part of the floor permanently.
What bums me out is there is no scale reference to the pictures (below). Some pearls are large ... ranging from an inch in diameter and others are small ... like a BB or a bead. Some "nests" are full of pearls and others may have a few. Lots of variations that cause these... err variations. But gorgeous none the less.
See ya'll next week!
Next week we start on Vertical... can you say whoo-hoo! ?? I thought you could.
If I had a photo I'd post it... One cave pearl I've seen was black. Very, very rare and not all that easy to get to in terms of traversing the cave to see it. Other pearls I've seen are similar to what you are looking at (below), which are gorgeous pictures by the way... best I've seen of these type.Pearls are a concentric concretion found in shallow cave pools. They can be spherical, as in the lower photo, or cylindrical, elliptical, and even cubical. They range in size from barely larger than a sand grain up to golf-ball sized. In the tropics, large beds of them may be found.
Cave pearls form when water dripping into the pool loses carbon dioxide and precipitates calcite. This precipitate usually forms around a nucleus of sand, bones, or fragments of soda straws or rafts. The typical roundness is due to the uniform growth of the pearl, not to any sort of rotation due to dripping. A sphere allows the greatest amound of deposition for the smallest surface area and is thus most likely, even if the nucleus is highly irregular. The dripping causes vibrations in the pool which may prevent the pearls from cementing (with calcite) to the pool floor, though many pearls are found cemented in. Sometimes excess precipitate will form cups or nests around the pearls, like in the photo on the bottom.
Many I've seen are cemented to the floor as in the last photo because the level of water has dropped or dried out and then later as water precipitates down to the floor and hits the formation it doesn't turn over like normal and thus becomes part of the floor permanently.
What bums me out is there is no scale reference to the pictures (below). Some pearls are large ... ranging from an inch in diameter and others are small ... like a BB or a bead. Some "nests" are full of pearls and others may have a few. Lots of variations that cause these... err variations. But gorgeous none the less.
See ya'll next week!
Next week we start on Vertical... can you say whoo-hoo! ?? I thought you could.
Attachments

WHOO-HOO!!!MACaver said:Next week we start on Vertical... can you say whoo-hoo! ?? I thought you could.
Vertical Caving.
This (to me) is probably one of the coolest, most exciting part of caving. Most people have experienced some rock climbing or done some type of rope work; like rappelling for example. But very few (outside caving) have actually gone down inside the earth and climbed back up out of it after hours of exploring inside.
My first time (after several weeks of above ground training) absolutely blew me away and I was just hooked on it. In-so-far I've accumilated well over 35K feet of on rope experience in the last 12-14 years. While I've been caving (off and on for the past 25+ years I've only been vertical for nearly half that long.
I have trained several dozen people in the past 10 years and enjoyed watching them grow and gain experience as I continue to do.
While I don't like calling it sport... I have looked at it that way on occasions... "yo-yo-ing a pit for exampel which means basically going up and down the same hole more than once just for the fun of it. It can be one of the most hazardous of outdoor activities known. Rescue from deep within a cave can take days instead of hours due to the logistics involved, especially vertical caves.
My classification of a "vertical cave" is any void in the earth requiring the use of a harness and vertical gear. This "class" will cover descending methods and ascending methods, various types of ropes, knots used by cavers, different techniques and some antecdotes of my own and others' experiences underground "On Rope!". I also will apply how I use Martial Art skills and techniques to various aspects of going underground. (in keeping with the format of this forum )
Disclaimer: I call this a "class" because it is my intent to educate the non-caver of our methods of exploration. This is by no means a way to learn the how to's. If you are truly interested in learning then look for a Grotto via the National Speleological Society (NSS) at www.caves.org
Going Down:
These are several of the items that we use to go down the ropes in caves.
In order: A Bobbin, Figure 8, A Rack. These are the most popular devices used in the U.S. Europeans tend to use the Bobbins more than anything else.
I'm still searching for pics on the web on how a Bobbin is used. While many folks I know swear by them, I personally don't like them. It's a personal preference and not anything bad or negative about the device itself. I normally use an 8 for short drops of anything between 10 to 100' depending upon the cave/drop. And a rack (shown threaded) for drops ranging from 50 to 300 feet or more. Each of these devices use friction to vary the speed a person slides down a rope. They are generally made of aluminum and some are of steel and there is a growing trend to use titanium for it's strength and extreme light weight.
A Rack (IMO) allows the user far more control of the rate of descent by varying the space between the "bars" (horizontal ones in the pic) and more surface area is spread out on contact with the rope thus the amount of heat transfer is less. 8's are excellent devices for the shorter drops because they're less likely to get heated up ... if the user goes slow. Nylon ropes are not receptive to heat and any of these devices can heat up fairly quick if they are used in a fast drop. If for example a person is zipping down at a rate of 5-10 feet per-second an 8 can heat up hot enough to melt the outer sheath of a rope and even through the inner core.
Slow and easy is the ticket, plus the benefits are rewarding in that 1. you get down alive, 2. catch some neat stuff on the way down that you otherwise would've missed, 3. Make the enjoyment of the trip last a little bit longer, 4. and make the lifeline (rope) last a lot longer as well.
My MA training has taught me a lot about balance and center of gravity and the applications to going down (and up) on a rope makes a world of difference. Since rappelling is nothing more than a controlled free-fall, balance helps out in keeping one oriented enough to be in more control of the rate of descent. Brain training and awareness training from MA applies here as well. Being aware of any and all safety factors from the knot in the main anchor to ensuring that your harness is put on and tightened correctly and securely, to ensuring that there is nothing that is going to unexpectedly drop down on you (though that does happen from time to time...which is why we love wearing helmets).
My present room-mate and long time caving buddy had the experience of dropping down a 280 foot entrance drop when approximately 100 foot down the drop a large boulder smacked him on the back of the helmet and tore his light off before continuing down the drop. He was stunned and bloodied (required 9 stitches in his scalp) but managed to stay alert and concious enough to faciliate a "self-rescue" and get himself up and out of the entrance pit. More on this later. I've had close calls of rocks and other debris falling on me and it's my awareness training that I feel really helped because I'm constantly looking up, down, and all around me while I'm rappeling.
This (to me) is probably one of the coolest, most exciting part of caving. Most people have experienced some rock climbing or done some type of rope work; like rappelling for example. But very few (outside caving) have actually gone down inside the earth and climbed back up out of it after hours of exploring inside.
My first time (after several weeks of above ground training) absolutely blew me away and I was just hooked on it. In-so-far I've accumilated well over 35K feet of on rope experience in the last 12-14 years. While I've been caving (off and on for the past 25+ years I've only been vertical for nearly half that long.
I have trained several dozen people in the past 10 years and enjoyed watching them grow and gain experience as I continue to do.
While I don't like calling it sport... I have looked at it that way on occasions... "yo-yo-ing a pit for exampel which means basically going up and down the same hole more than once just for the fun of it. It can be one of the most hazardous of outdoor activities known. Rescue from deep within a cave can take days instead of hours due to the logistics involved, especially vertical caves.
My classification of a "vertical cave" is any void in the earth requiring the use of a harness and vertical gear. This "class" will cover descending methods and ascending methods, various types of ropes, knots used by cavers, different techniques and some antecdotes of my own and others' experiences underground "On Rope!". I also will apply how I use Martial Art skills and techniques to various aspects of going underground. (in keeping with the format of this forum
)Disclaimer: I call this a "class" because it is my intent to educate the non-caver of our methods of exploration. This is by no means a way to learn the how to's. If you are truly interested in learning then look for a Grotto via the National Speleological Society (NSS) at www.caves.org
Going Down:
These are several of the items that we use to go down the ropes in caves.
In order: A Bobbin, Figure 8, A Rack. These are the most popular devices used in the U.S. Europeans tend to use the Bobbins more than anything else.
I'm still searching for pics on the web on how a Bobbin is used. While many folks I know swear by them, I personally don't like them. It's a personal preference and not anything bad or negative about the device itself. I normally use an 8 for short drops of anything between 10 to 100' depending upon the cave/drop. And a rack (shown threaded) for drops ranging from 50 to 300 feet or more. Each of these devices use friction to vary the speed a person slides down a rope. They are generally made of aluminum and some are of steel and there is a growing trend to use titanium for it's strength and extreme light weight.
A Rack (IMO) allows the user far more control of the rate of descent by varying the space between the "bars" (horizontal ones in the pic) and more surface area is spread out on contact with the rope thus the amount of heat transfer is less. 8's are excellent devices for the shorter drops because they're less likely to get heated up ... if the user goes slow. Nylon ropes are not receptive to heat and any of these devices can heat up fairly quick if they are used in a fast drop. If for example a person is zipping down at a rate of 5-10 feet per-second an 8 can heat up hot enough to melt the outer sheath of a rope and even through the inner core.
Slow and easy is the ticket, plus the benefits are rewarding in that 1. you get down alive, 2. catch some neat stuff on the way down that you otherwise would've missed, 3. Make the enjoyment of the trip last a little bit longer, 4. and make the lifeline (rope) last a lot longer as well.
My MA training has taught me a lot about balance and center of gravity and the applications to going down (and up) on a rope makes a world of difference. Since rappelling is nothing more than a controlled free-fall, balance helps out in keeping one oriented enough to be in more control of the rate of descent. Brain training and awareness training from MA applies here as well. Being aware of any and all safety factors from the knot in the main anchor to ensuring that your harness is put on and tightened correctly and securely, to ensuring that there is nothing that is going to unexpectedly drop down on you (though that does happen from time to time...which is why we love wearing helmets).
My present room-mate and long time caving buddy had the experience of dropping down a 280 foot entrance drop when approximately 100 foot down the drop a large boulder smacked him on the back of the helmet and tore his light off before continuing down the drop. He was stunned and bloodied (required 9 stitches in his scalp) but managed to stay alert and concious enough to faciliate a "self-rescue" and get himself up and out of the entrance pit. More on this later. I've had close calls of rocks and other debris falling on me and it's my awareness training that I feel really helped because I'm constantly looking up, down, and all around me while I'm rappeling.
Attachments
MACaver,
Verticle caving sounds fascinating. EVERYTHING you have described in this thread sounds fascinating actually. Please excuse my ignorance but when descending down the cave I am presuming that you need continuous rope to make it all the way down, meaning no knots in it to join two together . How far is the farthest drop that you have done and do you have pictures? What about your other cave enthusiasts? What is the farthest that they have gone? Do you have any big cave drops coming up? How long to the ropes last before they need to be replaced? Are they only made of nylon and why? And what about air quality deep in the caves? Is there a funky smell?
I know there are a lot of questions, but inquiring minds want to know
Lisa
Verticle caving sounds fascinating. EVERYTHING you have described in this thread sounds fascinating actually
. Please excuse my ignorance but when descending down the cave I am presuming that you need continuous rope to make it all the way down, meaning no knots in it to join two together . How far is the farthest drop that you have done and do you have pictures? What about your other cave enthusiasts? What is the farthest that they have gone? Do you have any big cave drops coming up? How long to the ropes last before they need to be replaced? Are they only made of nylon and why? And what about air quality deep in the caves? Is there a funky smell? I know there are a lot of questions, but inquiring minds want to know
Lisa
Woah there Turbo.Nalia said:MACaver,
Verticle caving sounds fascinating. EVERYTHING you have described in this thread sounds fascinating actually
I know there are a lot of questions, but inquiring minds want to know
Lisa
Questions answered below. But first I found more info on the Bobbin and I'd like to share that. A caver created a website that covers just about every device used vertically by other cavers and has extensive history on each. Dr. Gary Storrick. This is what he had to say on the bobbin device. http://storrick.cnchost.com/VerticalDevicesPage/Rappel/BobbinPages/BobbinComments.html
Ok on to the Q & A:
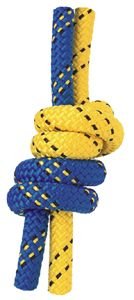
Usually we have a length of rope suited to the depth of the drop. However ropes have a nasty habit of accumulating weight the longer they get. In Utah with it's (oft steep) mountain terrian that is quite a bother...considering one is also carrying anywhere from 15-25 lbs of personal caving gear to boot. We will usually try to have one single length as long as it's practical to carry. One fella has a 400' single length and it's a good 45 lbs. I, myself, own a 300'er and it gets kinda hefty after about a mile or two hiking uphill with several more miles to go. We do tie ropes together when we have to. One such cave no-one knew the depth of a virgin drop and rope was guessimated and used and it was not enough so additonal rope was brought in for the next trip...that wasn't enough, til finally they reached the bottom. This was the beautiful 300' freehanging Fantasy Well in Neilsens Cave (-880').Nalia said:I am presuming that you need continuous rope to make it all the way down, meaning no knots in it to join two together
Pic below is one of the ways we tie two ropes together. Yes, it's strong enough.
My deepest to date is -400' (thereabouts) on a single drop. I average a lot less than that. I do have pics but not immediate. My roomie/caving-bud and I went to do this deep shaft (my 400'er) and he managed to reach the bottom which is about -710'. We dropped Calyume light sticks down the shaft the night before and thus he brought them back up... so he made it alright.Nalia said:How far is the farthest drop that you have done and do you have pictures? What about your other cave enthusiasts? What is the farthest that they have gone?
I want to arrange a trip to drop down the same shaft (again) with the intent to reach the bottom myself. Logistics right now are the only thing inhibiting this particular goal. Perhaps in the spring.Nalia said:Do you have any big cave drops coming up?
As with anything, ropes will have a long life provided that the owner takes care of it. My present ropes have been around for a while. They are due for a replacement but they should have a good life for another two or three years.Nalia said:How long to the ropes last before they need to be replaced? Are they only made of nylon and why?
Nylon has properties desired by many vertical sport enthusiasts; cavers, rock/ice climbers use nylon ropes because of the strength that nylon has.
Rope is one of the most important pieces of equipment. Therefore it needs to exhibit a number of very different characteristics. It is the combination of core and sheath designs that creates the balance of dynamic load absorbing ability, abrasion resistance and the overall strength necessary to give each climbing rope its desired performance characteristics. Caving/climbing ropes are built using kernmantle construction. The basic strength of a climbing rope is in its core (kern). The combination of mechanical and physical elongation of the nylon fibers allows a climbing rope the ability to absorb the energy of a falling climber. The core of a dynamic rope consists of individual core strands twisted clockwise and counterclockwise. These opposing twists help to minimize excessive spinning when lowering, abseiling or ascending.
A climbing rope's sheath (mantle) can be made in different thicknesses and braid patterns to achieve desired durability and handling characteristics. A thicker sheath will give greater durability and increased abrasion resistance. A thinner sheath can be used when a lighter weight rope is desired. A tightly braided sheath will slip very little on the core but adds stiffness to the overall flex of the climbing rope. A loosely braided sheath creates a rope that is more flexible and easier to handle, but allows more sheath slippage.
A rope must be able to absorb the energy of repeated falls and withstand fierce abrasion
Most of the funky smells comes from Caver sweat and farts.Nalia said:And what about air quality deep in the caves? Is there a funky smell?
Air quality in caves are generally very good. Barometric pressure from the outside helps move air in and out of caves via their openings. Thus the quality is refreshed frequently. In cases where caves have a high degree of organic matter at their lower-most limits then the quality of the air can be reduced due to decomposition/decay of said material (dead trees/leaves, etc.) and carbon dioxide is present instead of oxygen/nitrogen. Funky smells have also been attributed to the presence of bat/rat urine and fecal matter. One becomes accustomed to it or ignores it.
Anecdote: Boomerang cave is one of my favorites as it is a multi-pitched cave that reaches over 300'. The entrance drop is a gorgeous 130+ foot freehanging pit that is likened to rappelling the inside of a coke bottle. One trip I was one of the first ones down and about 30 or 20 feet from the bottom I indeed noticed a "funky" smell. I continued down and got off rope and stood there for a moment looking around wondering "what is that smell" (gag). I looked everywhere then finally shifted my weight and yeeech... found that I was standing in the middle of a dead skunk that had fallen in probably a week before. There was no martial arts move/thought/application that could counter that!! EWWWWW!
Attachments
Vertical Caving: Going up.
Ok, ya'll got the basics of how we get down in those holes but now on to how we get out of them.
There are dozens of different ways to get out of a cave. Freeclimbing however isn't one of them... well mebbe for something like six or eight feet and lots of good hand/foot holds.
For a long time cavers in the 40's and 50's used either rope or wooden ladders to get in and out. Crazy I know but it's what they had. And even then they rarely ventured down more than 50 feet or so. Then the advent of stronger rope and stronger (steel) cables came into play and cavers were able to plumb depths well over 200 feet. A belay rope was used to catch the caver in the event of a fall. While this method is being phased out it is still being used here and there. I myself have used it only once or twice and didn't think much of it.
Meanwhile in Europe; the Prusik knot was invented in 1931 by Dr. Karl Prusik and was described in an Austrian mountaineering manual describing it as an ascending knot. Cave explorers used this widely and as the mountaineering techniques found their way here to the states, in 1952 a caver by the name of Bill Cuddington tried them out and advocated their use. Prior to this innovation, all vertical work was done by block and tackle hauling, or simple hauling without the aid of mechanical advantage and ladders. The sheer bulk and weight of block and tackle rigs as well as the bulk of ladders became a significant limiting factor in the successful exploration of deep caves. Cavers were now able to go deeper because of the more efficent way to exit. I mean, that's the whole point right? Why go down so deep that you can't get out? By the 60's and 70's the invention of mechanical ascenders (below are modernized versions but the design is basically the same) which are nothing more than the mechanized versions of a prussik knot, greatly enhanced the field of vertical caving. Caves with deep drops were "pushed" and new depth records were created.
Next up we'll discuss about the harnesses and types of ropes used and a wee bit of the history there. Then move on to types of ascending systems.
:asian:
Pics: Cable Ladder, Prussik knot, hand ascender, croll and basic ascender
Attachments
This is a website that a caver dad set up for his daughter. Looks like she might be in it for life. She's already been put in several newspaper articles and magazines for kids. Kinda cool I think.
http://www.coloradocaving.com/
http://www.coloradocaving.com/
OP
Flatlander
Grandmaster
- Thread Starter
- #89
Weird, man. I would have never guessed that such a thing could exist. Ralph, you are a fascinating fellow. I'm so glad I started this thread. I'm even happier you keep it rockin'.Cave Formation of the Week: Cave Pearls

MACaver,
This is such a cool thread and explaining the whole entire process is making me a little less edgy about trying it out some day. You know how knowledge is power? It is funny that your post is how to get out cause the other day while driving home from work, I started thinking exactly that! LOL!
Thanks again and keep it coming please!!!
This is such a cool thread
and explaining the whole entire process is making me a little less edgy about trying it out some day. You know how knowledge is power? It is funny that your post is how to get out cause the other day while driving home from work, I started thinking exactly that! LOL! Thanks again and keep it coming please!!!
Ok continuing with the lesson.
Ascending is the way we get out of a deep pit. Climbing on the rope. The individual parts have been shown but how are they all put together?
Pic 1. shows one configuration. This can be modified to suit the user and adjusted as shown in Pic 2. This particular configuration is known as the Frog system a "sit-stand" method. The caver attaches the units to the rope and then begins by sitting down and taking up the slack til the rope tensions on the anchor above. Then they stand up and the ascender that is pulled up the rope via the "chest-harness" and the whole process is repeated, (Pic 3)til the caver is topside or where they want to be.
For Europeans this is the standard method, in the States it's one of the most popular but there are dozens of variations... too many to go into here.
Pics 4 & 5 show another configuration that is popular because some folks are top-heavy and find it difficult to support their upper body weight.
The rope is attached via ascenders on the foot (Pic 5) and through a roller on the chest (Pic 4). There is a third ascender attached to the seat harness and that is called the safety and rest ascender. The foot ascenders have a bungee cord attached to them and that cord is run up over the front of the chest harness and it is used to pull up the ascender when the caver takes a step.
Basically after all the slack is taken out of the rope and tensioned at the top and bottom (easier than it sounds) and the caver basically just lifts one foot and steps and then the other and essentially just walks up the rope. Thus the name Ropewalker.
I use both Frog and Ropewalker systems ... depending upon the cave. The Frog I can use for basically any cave and depth, but normally I use it for drops between 25 to 150 feet. On deeper stuff I'll use my ropewalker system.
Both offer great Cardio and aerobic work outs. You're basically pulling your own weight up the rope. If done correctly your legs will be doing most of the work but some drops (another post) will require the entire body to be put to use.
Attachments
I tell my beginner students to anticipate spending roughly anywhere between $200 to $250 and count on the stuff lasting for YEARS afterwards if they take care of it, this is including helmet, harness and hardware (carabiners, decenders and ascenders) and soft ware (webbing and cordage). Figure another $12 to $70 bucks for the headlamp.Tgace said:Ive done sport climbing for a few years...done the rappelling, ascending, protection/ropework thing, but you cavers are a whole other level.....whats your estimate on gear outlay??
I have some pieces of gear that's between 10-14 years old. So the long term investment is well worth it as they pay for themselves. I've gotten a lot of use out of much of my stuff and for me that is a bonus.
(Vertical) Cavers have grown over the last 30-40 odd years and have adapted a lot of techniques from outdoor climbing guru's. But yeah, it has evolved to it's own level due to the radical differences with the contact of the rock surfaces. What I find interesting is that Rock/Ice climbers are becoming more attracted to SRT (Single Rope Techniques) because of the energy saving methods we use.
SRT Continued.
Rigging: <disclaimer> This is just to outline how and why we do things the way we do. There are numerous details that will not be added here as it would take Gigabyteswink1: ) of poor Kaith and Bob's server space to do it. These lessons are by no means intended to be tried without adequate training and supervision by an experienced climber/caver. These lessons are merely for the layman to better understand caving and for the "arm-chair" caver who may never enter one but has an idea of what's involved.
-------------------------------
Cave rigging gets much of it's methods from both Rock Climbing and Alpine Mountaineering techniques with a few differences added in to suit the situation.
With the erosional features found deep within caves there are numerous of ways to rig a rope. There are also many things to watch out for during the rig as not everything is as it seems and because cavers climb directly on the rope instead of the rock the danger of damage to the rope is increased, so special care must be made.
Many caves I visit rarely require the use of a pad. This is to say that the rock face is worn so smoothly that there's little danger of a rope being cut by sharp edges. However, this assessment must come after careful examination along the entire length of the drop to ensure that there is no danger. But even then it's hard to spot.
Several times I've been on a trip where things looked okay on the way down, only to find the rope severely worn on the way back up. Scary stuff to be sure... particularly when there's anywhere between 100-250 feet of open space below you. So pads are required. Some are totally wrapped around the ropeFig. 1 and others are as simple as a piece of carpet or the trouser leg off a pair of old blue jeans laid flat on the rock and the rope goes over it. Basically anything that puts space between the rope and the rock and eliminating damaging rubs.
Sometimes this is not always possible ... or just too much trouble so a rebelay is in order Fig. 2, belay is the French word for Safety. These can be simple or relatively complex Figs. 2 & 3. Point is to minimize damage to the rope or life-line. Rigging stuff for rescue work is even more complex due to the number of ropes needed and the complexity of some haul systems.
Drilled anchor bolts Fig 4are most commonly used for "permanent" or "semi-permanent" fixtures in caves. We use these when there are long term projects going on or it would be much safer or simply no other choice. The idea is to minimize impact to the (cave) environment and if we can we'll go without and use some of the rig methods that are shown in Fig. 5 among others. Thes rig points are sometimes called natural anchor.
One of the things one has to watch out for when choosing a particular "natural anchor" is to look for any obvious fractures in the rock surface. Or if the area is surrounded by a thick coating of mud which is sometimes the case and ones to avoid. What appears to be a "bomb-proof" rock may be just sitting on a coating of mud and the whole thing slides off with you on the end of it all, looking like Wilyee Coyote waiting for it all to come down on top of you, tiny umbrellas not withstanding.
I've rigged dozens of caves on hundreds of trips and thanks to the training I've received never had a problem. On trips where there were "near-misses" the cave was pre-rigged and numerous trips before ours caused the damage. This was taken care of by simply re-rigging the rope(s) and informing the owner of the damage. No blame is cast as it is something that has to be dealt with on this type of activity/FUN.
More to come.
p.s. the drawings are not mine... downloaded from various caving sites... (public domains)
Rigging: <disclaimer> This is just to outline how and why we do things the way we do. There are numerous details that will not be added here as it would take Gigabytes
wink1: ) of poor Kaith and Bob's server space to do it. These lessons are by no means intended to be tried without adequate training and supervision by an experienced climber/caver. These lessons are merely for the layman to better understand caving and for the "arm-chair" caver who may never enter one but has an idea of what's involved. -------------------------------
Cave rigging gets much of it's methods from both Rock Climbing and Alpine Mountaineering techniques with a few differences added in to suit the situation.
With the erosional features found deep within caves there are numerous of ways to rig a rope. There are also many things to watch out for during the rig as not everything is as it seems and because cavers climb directly on the rope instead of the rock the danger of damage to the rope is increased, so special care must be made.
Many caves I visit rarely require the use of a pad. This is to say that the rock face is worn so smoothly that there's little danger of a rope being cut by sharp edges. However, this assessment must come after careful examination along the entire length of the drop to ensure that there is no danger. But even then it's hard to spot.
Several times I've been on a trip where things looked okay on the way down, only to find the rope severely worn on the way back up. Scary stuff to be sure... particularly when there's anywhere between 100-250 feet of open space below you. So pads are required. Some are totally wrapped around the ropeFig. 1 and others are as simple as a piece of carpet or the trouser leg off a pair of old blue jeans laid flat on the rock and the rope goes over it. Basically anything that puts space between the rope and the rock and eliminating damaging rubs.
Sometimes this is not always possible ... or just too much trouble so a rebelay is in order Fig. 2, belay is the French word for Safety. These can be simple or relatively complex Figs. 2 & 3. Point is to minimize damage to the rope or life-line. Rigging stuff for rescue work is even more complex due to the number of ropes needed and the complexity of some haul systems.
Drilled anchor bolts Fig 4are most commonly used for "permanent" or "semi-permanent" fixtures in caves. We use these when there are long term projects going on or it would be much safer or simply no other choice. The idea is to minimize impact to the (cave) environment and if we can we'll go without and use some of the rig methods that are shown in Fig. 5 among others. Thes rig points are sometimes called natural anchor.
One of the things one has to watch out for when choosing a particular "natural anchor" is to look for any obvious fractures in the rock surface. Or if the area is surrounded by a thick coating of mud which is sometimes the case and ones to avoid. What appears to be a "bomb-proof" rock may be just sitting on a coating of mud and the whole thing slides off with you on the end of it all, looking like Wilyee Coyote waiting for it all to come down on top of you, tiny umbrellas not withstanding.
I've rigged dozens of caves on hundreds of trips and thanks to the training I've received never had a problem. On trips where there were "near-misses" the cave was pre-rigged and numerous trips before ours caused the damage. This was taken care of by simply re-rigging the rope(s) and informing the owner of the damage. No blame is cast as it is something that has to be dealt with on this type of activity/FUN.
More to come.
p.s. the drawings are not mine... downloaded from various caving sites... (public domains)
Attachments
We pause for this station break:
I finally managed to take Byron to his first cave ever! He had a total blast. These are the pics of him in Spanish Moss. He did sooo well there, all that training before hand really paid off. There were one or two spots where he was sketchy about free climbing but with patience and encouragement he did them well.
He loves to climb, no question, but being in a dark environment and that head lamp being the only light he had (among ours) he worked his way up and down fairly easy climbs (well, they're easy to me anyway ). But once having done them then over time they become easy.
What helped me (and I hope helps this Kenpo Jr. Brown Belt) is realizing by applying the understanding that practice makes perfect whether in Martial Arts or in Caving or driving a car. I recall on those very same climbs how sketchy they were to me, I used to freak out so bad in my early days of caving because I thought I was going to die. Now I go up those things without a second thought. I still do them safely and carefully (I'm getting old :wah: ) but now-a-days :idunno: what's the big deal huh?
Anyway here's Byron having a great time. So glad the pics turned out with a simple point-n-shoot-disposable.
1. Byron peeking out behind a set of massive columns. Above him are long stalactites. This portion of the cave is interesting for one reason as parts of it are bone dry and others are wet and slick (light and dark areas).
2. Group photo. The fella sitting in the dark green and white helmet has muscular dystrophy <sic> and he did really well considering. He "practiced hard for a week" so he could do this cave.
3. This shot was Byron's idea. I had to literally verbally guide him through all those delicate stuff (do-able but gotta follow instructions exactly). The look on his face of course says it all. That impish grin.
4. At the top of one of those "sketchy climbs" to his immediate right there's an exposed 12 foot drop. I had him stop and pose here to distract him from the "gaping maw" next to him. hey, it worked didn't it?
5. "On Rope" and heading out. This was his first ascent in many ways. First in a real cave, first in his brand new Christmas present (harness) and first long drop (relatively speaking) as he's only done maybe 15-20 feet at the most. This drop is a little over 33 feet for the "free-hanging" portion (where's he at) and another 31 feet in a (then ) muddy twisty cork-screw.
I finally managed to take Byron to his first cave ever! He had a total blast. These are the pics of him in Spanish Moss. He did sooo well there, all that training before hand really paid off. There were one or two spots where he was sketchy about free climbing but with patience and encouragement he did them well.
He loves to climb, no question, but being in a dark environment and that head lamp being the only light he had (among ours) he worked his way up and down fairly easy climbs (well, they're easy to me anyway
). But once having done them then over time they become easy. What helped me (and I hope helps this Kenpo Jr. Brown Belt) is realizing by applying the understanding that practice makes perfect whether in Martial Arts or in Caving or driving a car. I recall on those very same climbs how sketchy they were to me, I used to freak out so bad in my early days of caving because I thought I was going to die. Now I go up those things without a second thought. I still do them safely and carefully (I'm getting old :wah: ) but now-a-days :idunno: what's the big deal huh?
Anyway here's Byron having a great time. So glad the pics turned out with a simple point-n-shoot-disposable.
1. Byron peeking out behind a set of massive columns. Above him are long stalactites. This portion of the cave is interesting for one reason as parts of it are bone dry and others are wet and slick (light and dark areas).
2. Group photo. The fella sitting in the dark green and white helmet has muscular dystrophy <sic> and he did really well considering. He "practiced hard for a week" so he could do this cave.
3. This shot was Byron's idea. I had to literally verbally guide him through all those delicate stuff (do-able but gotta follow instructions exactly). The look on his face of course says it all. That impish grin.
4. At the top of one of those "sketchy climbs" to his immediate right there's an exposed 12 foot drop. I had him stop and pose here to distract him from the "gaping maw" next to him.
hey, it worked didn't it? 5. "On Rope" and heading out. This was his first ascent in many ways. First in a real cave, first in his brand new Christmas present (harness) and first long drop (relatively speaking) as he's only done maybe 15-20 feet at the most. This drop is a little over 33 feet for the "free-hanging" portion (where's he at) and another 31 feet in a (then ) muddy twisty cork-screw.
Attachments
Break out your 3-D glasses... found this caving site which offers cave views in 3-D. If you got kids you should have a pair or so laying around. If not then try using some red/blue or cyan colored plastic and see if that works. Purty cool I think.
I finally got to go underground for the first time! I went on January 22, 2005, but it took me a while to compose the report as I was waiting for the pictures. I'll post a condensed version of my report on Monday for ya'll to read, entitled "A Beginner's View of Caving" with the subtitle, "How Kenpo Helps with Caving". I think it's cool that while I'm underground, the martial arts training transfers over to caving. I'll include some pictures also when I make the post. More to come!
- Ceicei
- Ceicei
Here is my condensed version.
A Beginner's View of Caving
(How Kenpo Helps with Caving)
Part 1: Preparing at Home
January 22, 2005
A gentle light flashing, its 6:00 a.m. I look at the alarm clock and turn it off and roll over onto my back, staring at the ceiling. Today is the day we are going caving! Lets see, we've got everything ready and packed. My 12-year-old son, Byron, and his best friend, Braydon, are asleep downstairs in the TV room. We need to pick up Ralph (MACaver)at 8:30 and meet Hank at 9. Yeah, there is plenty of time. I can sleep in for half an hour more. I reset the alarm. ZZzzzzzzzz. 6:30 a.m. More gentle flashing light from the clock. I get up and get dressed in layers of clothing to remain warm. I put on two complete pairs of thermals and my stretchable jeans. (Ha! I love stretchable jeans! I learned about those from my martial arts friends. They werent kidding that a person can actually kick well wearing them!) Since Ill be doing a lot of climbing, I need stretching room with my clothes. I donned my black turtleneck and my yellow martial arts school t-shirt. Next comes two pairs of woolen socks and my steel-toed brown hiking boots. I add my thermalite gray jacket. Now Im all set!
Before I leave the room, I open a drawer to pick up my silver Universal Pattern Kenpo necklace. I put it on and tuck it under my t-shirt. Its a martial arts symbol showing multiple directions of motion. If Im going underground, I want to take something that reminds me to conserve energy in motion. I also put on a flat steel wristband showing an etched yin-yang symbol with a dragon on the left and a tiger on the right. On the inside of the wristband is my name. It will be my only form of ID while Im underground. Ok. If anything happens to me, people will find, Theres a martial artist. I shake my head, enough of this thinking. Im too nervous, not knowing what to expect, and very excited. Although Im aware of the risks, nothing bad is going to happen today. Today, its all for real! Weve practiced for weeks at an indoor climbing wall and a nearby canyon. Now well take what we learn and go underground.
I wake up my oldest son, Byron and his best friend, Braydon. They are also going caving with me. I make breakfast. I kiss and say good bye to the rest of my family.
It is a very foggy, cold morning with little visibility. We drive down to meet MACaver and his friend, Hank. They have the rest of the caving gear we need. We meet at the trail leading up to the mountain.
Part 2: The Trek Up the Mountain
We then start the trek up the rocky and very icy path through Rock Canyon. Snow is still there from the storm a few days before. The sun comes up, finally breaking the fog. The mountainside reveals her beauty, glowing in sunrise. I see some caves dotting along the sides. I didnt realize there are that many caves in Rock Canyon. Ralph says we need to get to the fourth footbridge before we get off the path and climb up the mountain. I see no running water in the river. Its all dried up, but I see a frozen waterfall on the mountainside. Fascinating!
Fourth bridge, pah! Crossing over those small footbridges are trickytheyre covered with ice. At the bridge, I wait for Ralph and Hank. They pause to talk with a friend whos coming down the path. Byron and Braydon already are clambering up. Byron knows where to go. Ralph and Hank approaches then climb up too. I follow them. The climb is very slippery and approximately 60-70 degrees uphill. If I slip and lose my hold, there isnt much to stop me from tumbling all the way down to the path.
Part 3: At the Cave Entrance
We finally arrive up to the cave entrance and put on our caving gear. Ralph proudly shows his point-and-snap camera. He and Hank are going to take pictures of us during this caving trip. Neat idea! Ralph and Hank check everyones gear to make sure everything is all fastened properly. Hank shows me the switch on my headlamp (two different lights, and one light can be dimmed). Before going in the cave, we all relieve ourselves behind some nearby trees. I look at my watch. By then, it is 10:45 a.m. The sun is warming up. The boys and I eat some beef jerky, granola bars, and sip from our drinks while Ralph ties one of his few ropes for us to climb down into the cave.
Ok. Ive been training for this. My life depends upon the harness and the 8-ring descender. I slowly descend down while peering at the walls, trying to take in what I see. I land a little further than I should, next to the low man-made sandbagged wall, missing the narrow landing ledge. Braydon is there on the ledge and he extends a hand to me. I grab his hand and climb up next to him.
A gentle light flashing, its 6:00 a.m. I look at the alarm clock and turn it off and roll over onto my back, staring at the ceiling. Today is the day we are going caving! Lets see, we've got everything ready and packed. My 12-year-old son, Byron, and his best friend, Braydon, are asleep downstairs in the TV room. We need to pick up Ralph (MACaver)at 8:30 and meet Hank at 9. Yeah, there is plenty of time. I can sleep in for half an hour more. I reset the alarm. ZZzzzzzzzz. 6:30 a.m. More gentle flashing light from the clock. I get up and get dressed in layers of clothing to remain warm. I put on two complete pairs of thermals and my stretchable jeans. (Ha! I love stretchable jeans! I learned about those from my martial arts friends. They werent kidding that a person can actually kick well wearing them!) Since Ill be doing a lot of climbing, I need stretching room with my clothes. I donned my black turtleneck and my yellow martial arts school t-shirt. Next comes two pairs of woolen socks and my steel-toed brown hiking boots. I add my thermalite gray jacket. Now Im all set!
Before I leave the room, I open a drawer to pick up my silver Universal Pattern Kenpo necklace. I put it on and tuck it under my t-shirt. Its a martial arts symbol showing multiple directions of motion. If Im going underground, I want to take something that reminds me to conserve energy in motion. I also put on a flat steel wristband showing an etched yin-yang symbol with a dragon on the left and a tiger on the right. On the inside of the wristband is my name. It will be my only form of ID while Im underground. Ok. If anything happens to me, people will find, Theres a martial artist. I shake my head, enough of this thinking. Im too nervous, not knowing what to expect, and very excited. Although Im aware of the risks, nothing bad is going to happen today. Today, its all for real! Weve practiced for weeks at an indoor climbing wall and a nearby canyon. Now well take what we learn and go underground.
I wake up my oldest son, Byron and his best friend, Braydon. They are also going caving with me. I make breakfast. I kiss and say good bye to the rest of my family.
It is a very foggy, cold morning with little visibility. We drive down to meet MACaver and his friend, Hank. They have the rest of the caving gear we need. We meet at the trail leading up to the mountain.
Part 2: The Trek Up the Mountain
We then start the trek up the rocky and very icy path through Rock Canyon. Snow is still there from the storm a few days before. The sun comes up, finally breaking the fog. The mountainside reveals her beauty, glowing in sunrise. I see some caves dotting along the sides. I didnt realize there are that many caves in Rock Canyon. Ralph says we need to get to the fourth footbridge before we get off the path and climb up the mountain. I see no running water in the river. Its all dried up, but I see a frozen waterfall on the mountainside. Fascinating!
Fourth bridge, pah! Crossing over those small footbridges are trickytheyre covered with ice. At the bridge, I wait for Ralph and Hank. They pause to talk with a friend whos coming down the path. Byron and Braydon already are clambering up. Byron knows where to go. Ralph and Hank approaches then climb up too. I follow them. The climb is very slippery and approximately 60-70 degrees uphill. If I slip and lose my hold, there isnt much to stop me from tumbling all the way down to the path.
Part 3: At the Cave Entrance
We finally arrive up to the cave entrance and put on our caving gear. Ralph proudly shows his point-and-snap camera. He and Hank are going to take pictures of us during this caving trip. Neat idea! Ralph and Hank check everyones gear to make sure everything is all fastened properly. Hank shows me the switch on my headlamp (two different lights, and one light can be dimmed). Before going in the cave, we all relieve ourselves behind some nearby trees. I look at my watch. By then, it is 10:45 a.m. The sun is warming up. The boys and I eat some beef jerky, granola bars, and sip from our drinks while Ralph ties one of his few ropes for us to climb down into the cave.
I took my first look at the entrance. Its so small. Somehow, I envisioned it would be bigger, the size of a walk-through doorway. This entrance is a hole just big enough for one person to crouch down and go in, feet first. Ralph leads, Byron, Braydon, me, and Hank. [Picture 1 shows Braydon in white helmet.]
It's my turn going in. Now its just me, the harness with a figure-8 descender, and the rope. I see three lights below belonging to Ralph, Braydon, and Byron. I peer up to the entrance, the last vestige of sunlight. I wave to the light. Good bye until we come back. [Pictire 2 is me.]
Ok. Ive been training for this. My life depends upon the harness and the 8-ring descender. I slowly descend down while peering at the walls, trying to take in what I see. I land a little further than I should, next to the low man-made sandbagged wall, missing the narrow landing ledge. Braydon is there on the ledge and he extends a hand to me. I grab his hand and climb up next to him.
Attachments
Part 4: Exploring the Cave
I recall Ralph telling me there is the attic and the basement of Spanish Moss cave. Byron and Braydon are already making their way up towards the attic (known as the Barking Beetle room). I find only one dead beetle. No other beetles, either alive or dead. I wonder if they bark. Maybe its too cold for the beetles. I follow soon after the boys. [Byron is wearing dark clothes and a blue helmet, Braydon has the white helmet. My gray jacket looks light blue under headlamp light.]
We free climb up some more among the flowstone and popcorn formations. Im fascinated by the popcorn formations. Theyre very smooth and resemble sandy-colored popcorn. [The popcorn can be seen on the right side of the picture. I am climbing up. Hank in the orange suit and red helmet is below me.] Some popcorn are very large and make good hand/foot holds.
At one point, my right foot got stuck in a crevice as I moved up and I could feel my toes pop. I forget Im not wearing my steel-toed boots. I gently move my left foot down so I can dislodge my right foot. I wiggle my toes, wondering if a toe is broken. I shine the light on my caving boot. No damage to the boot, so it is fine. I think my toes are fine too since I can move them. We pause to step up and look through a very small, short tunnel, only a foot or two in diameter and maybe four or five feet in length. I peer through one end and Ralph peers through the other end. We see each other. Hi!
Ralph tells me to climb up some more into a narrow spiraling area. It is only big enough for one person at a time to go there. Aha! I see heavy, brown masses of tree roots hanging, the Spanish Moss. Amazing! Were not that far off from the surface and the roots of these trees manage to get down through the rocky crevices of the cave ceiling. So this is the reason for the caves name. I touch the walls near the roots. It is damp and slick. Thats how the roots get hydrated.
We climb back down to the Barking Beetle Room. Byron says, turn off the lights. We all turn off the lights. Pitch black darkness. I put my hand in front of my face. I cant even see my nose. There is nothing here visible for my eyes to adjust to and see. We turn the lights on again and go back down to the same place, the ledge, where we landed descending from the entrance. There is a low man-made sandbagged wall to prevent rocks from crashing downward and hitting the people and damaging the formations below. I see some of the rocks that the wall stopped. Some of them are huge. I wouldnt want to be hit by one, even if Im wearing a helmet!
Ralph ties a rope to the sandbagged wall. We climb over and use the rope to go down the incline. There is not of much interest to see on the way going down. Ralph mentions that at the bottom of the incline, there is a lot to see, many beautiful formations. We will be going to an area called The Subway Passage.
While waiting for my turn to go down, I sip from the drink I bought from the store. I briefly consider eating some beef jerky or a granola bar then decide I will do that later. It is my turn and I go down. I arrive to the incline bottom.